If you’ve ever been baffled by all the jargon that’s used in photography (aperture? f-stops? what on earth is ISO?!) then I hope this post will go some way to explain all the photography terms that you’ve ever wondered about (but never thought to ask).
As with all my photo tips posts I try to explain everything as simply as possible. I write them assuming you don’t know the meaning of any jargon at all, so it’s layman’s terms all the way.
I’ve picked what I think are the most common terms that are used which are essential to know more about (and understand) if you wish to improve your photography skills.
If you have any questions at all please don’t hesitate to leave a comment or tweet me – and if you’ve found this jargon-busting post useful please do let me know and feel free to share it on Twitter or Facebook!
Aperture
In optics, an aperture is “a hole or an opening through which light travels”. So in a camera, the aperture is the hole in the lens that lets light through, and this can vary from a very small hole to a very large hole.
The aperture of a lens works very much like your eyes: your pupils get bigger and smaller to let in more or less light according to how much light there is. A lens does exactly the same thing.
The size of the hole (the aperture) depends on the amount of light in the scene you’re photographing and whether you’ve set it manually (to set the aperture yourself) or whether you have it on auto (where the camera will determine what aperture to set).
See f-stop (below) for how aperture is measured.
Bokeh
Bokeh is the term used to describe the out-of-focus parts of a photograph which have blurred to create a pleasing blurry “points of light” effect (see below). It’s often used to describe a blurry background effect, but strictly it’s for points of light. Think fairy lights gone out of focus.
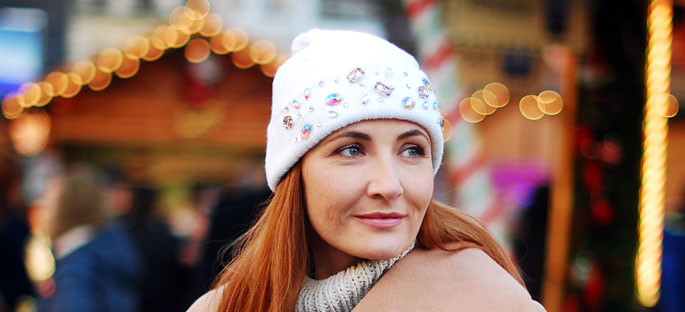
To find out how to create this effect, see my post on How to Achieve Photographic Bokeh.
The pronunciation: there is debate over how bokeh is pronounced. The most widely accepted pronunciation is “bo-ke” (“ke” like the first part of “Kenneth”), with no emphasis on either syllable.
This video explains how to pronounce bokeh (though he insists there is only one way to say it). Note: It definitely doesn’t rhyme with “okay”.
Bridge camera
A bridge camera is a camera that’s in between point-and-shoot and DSLR cameras – they “bridge the gap” between the two. They look much like a DSLR, with a lens that sticks out at the front and a chunky body, but unlike DSLRs the lens is fixed. (Some bridge cameras do have retractable lenses, however.)
The advantage of a bridge camera over a point-and-shoot is that you have far more control over your settings: depending on the model you can adjust, for example, the aperture (see above), shutter speed (see below), the ISO (see below), thus allowing you greater creativity. Because the lenses are not interchangeable, they are generally cheaper than DSLRs.
Depth of field
Basically, depth of field is how much of the image (depth-wise) is in focus. More specifically, it is the distance between the nearest and farthest point that is deemed to be in focus, or sharp. See the image below:
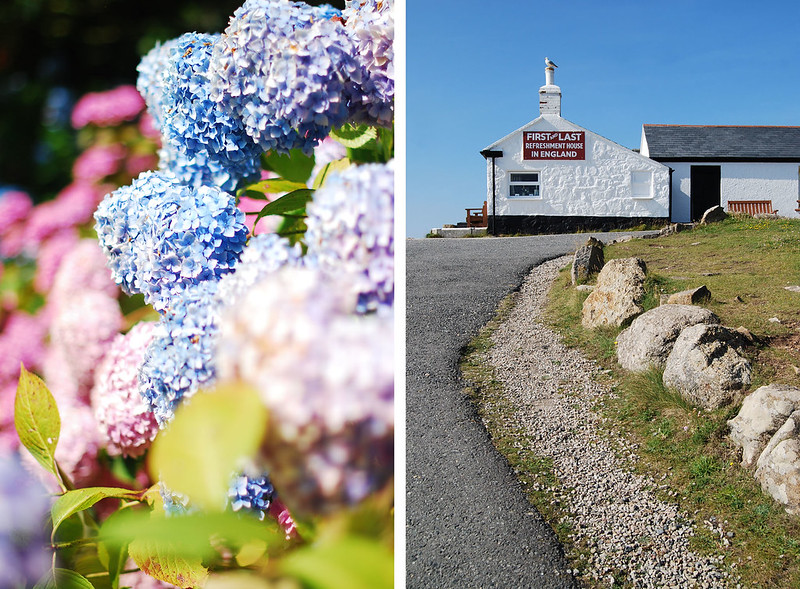
Left: small depth of field, Right: large depth of field.
DSLR
DSLR stands for Digital Single Lens Reflex [camera]. Digital means it produces digital images that are stored on a memory card in the camera. Single Lens Reflex means the viewfinder of the camera gives you the same view that the lens sees, because you are actually looking through the lens via mirrors and prisms. An SLR camera is exactly the same except that it uses film to produce negatives, not a digital memory card.
Point-and-shoot, or compact, cameras are not SLR cameras as they don’t have interchangeable lenses that stick out on the front of the camera (where the mirrors and prisms are). You have a lot less control over the settings because you can’t set aperture (see above), ISO (see below), and so on to your specific preference that you can with SLR cameras.
Exposure
The exposure of a photograph is how much light is let into the image. It’s easier to think of film photography because when you use film, the exposure is how much light is hitting the film. It’s determined by the aperture (see above), the shutter speed (see below) and how much ambient light there is in the scene.
If an image is underexposed then not enough light was let into the image/hitting the film – it will appear too dark.
If it’s overexposed then too much light was let into the image/hitting the film – it will appear too light/bright.
Note: in photography there is also “an” exposure, which refers to the action of the shutter (see below) opening and closing in the camera in order to take the photograph.
f-Stops
You now know what aperture is (the size of the opening in a lens, see above). Aperture is measured in f-stops (f stands for focal) – they are sometimes referred to as the f-number.
The image below shows some of the f-stops a lens has (there are more in between, e.g. f1.8, f3.5) and how it affects depth of field. Not all lenses have all the f-stops (see lens speed below).
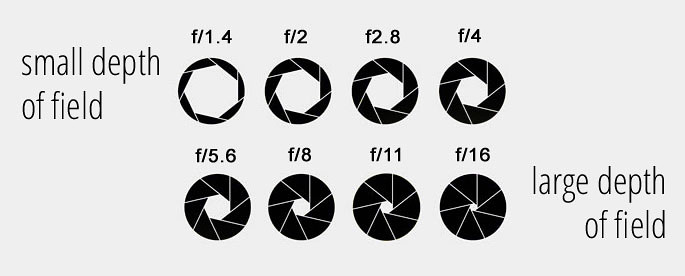
The larger the aperture, the smaller the f-stop number (confusing, I know). Remember:
A SMALL NUMBER, e.g. f1.4 = a BIG HOLE and a SMALL DEPTH OF FIELD.
A LARGE NUMBER, e.g. f16 = a SMALL HOLE and a LARGE DEPTH OF FIELD.
Therefore, to get bokeh or blurry backgrounds, you need a large aperture like f1.4 or f1.8 to create a small depth of field.
For a fun, quick lesson that demonstrates how aperture works with the human eye, see this post. All you need is your hands, your eyes and a space of about 6 feet (2m) or more in front of you. Prepare to be amazed…!
Pin for later!
Focal length
The focal length of a camera’s lens is the measured distance in millimetres (mm) between its physical centre and its focus on infinity. You don’t need to remember that, just remember this:
The smaller the number (e.g. 28mm), the greater the amount of landscape that will be captured in the image. The larger the number (e.g. 70mm, 210mm), the smaller the amount of landscape that will be captured.
So as a lens with a short focal length captures more in the image it is called a wide angle lens. A lens that captures less is called a telephoto lens. A lens that can be altered from wide angle to telephoto (i.e. having a variable focal length) is called a zoom lens.
Golden hour
In photography, the hour before sunset and the hour after sunrise are both known as the golden hour. It produces a warm, soft glow and because the sunlight is hitting the subject horizontally rather than vertically it doesn’t create any harsh shadows (under the nose, for example), so it’s incredibly flattering.
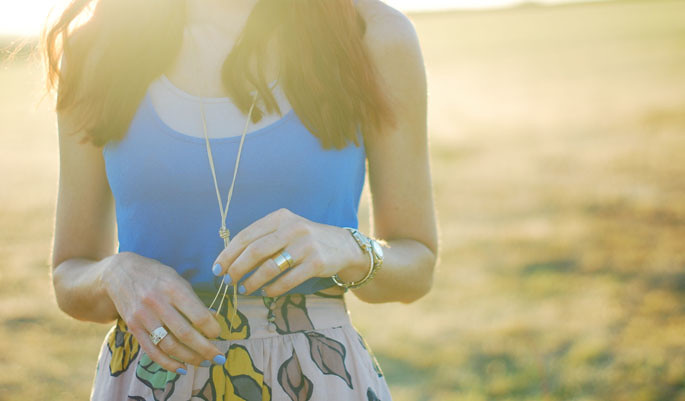
You can also shoot with the setting/rising sun behind the subject to create an even softer effect.
ISO
This is easier to think about in terms of photographic film. (You can of course still buy film to use in non-digital cameras, but for this post I’m assuming everyone is using digital.)
The ISO of film is how sensitive it is to the light entering the camera. You can buy high and low ISO film (and many in between). In digital cameras the ISO is how sensitively the camera reacts and records the light to create an image.
A lower ISO (100) will be less sensitive to light so you need to have a lot of light entering the lens, e.g. a bright sunny day.
A higher ISO (800+) will be more sensitive to light so you don’t need to have as much light entering the lens, e.g. a low-lit interior with little daylight coming in.
Some modern DSLR cameras have an ISO sensitivity range from ISO 100 to an amazingly high ISO 6400 (I’ve rarely had to go above ISO 800 ever).
Note that the higher [number] ISO, the more grainy the image will be. However, DSLRs made today produce images of incredible quality, so e.g. ISO 800 on a digital camera is nothing like as grainy as photographic film of ISO 800.
Lens speed
The speed of a lens is determined by the maximum aperture of the lens. If its maximum aperture is f4 it’s considered a slow lens. If its maximum aperture is f1.4 it’s considered a fast lens.
A fast lens with a large maximum aperture (f1.4) will let in more light, thereby allowing you to use a lower ISO and shoot in lower light levels, giving you less grain and sharper images. As light is everything in photography, fast lenses cost more money. Read my full explanation of a fast standard lens in my 6 Camera Equipment Essentials post.
Shutter/shutter speed
The shutter is effectively a little trap door behind the lens that opens and closes to let in light in order to convert it into an image.
Shutter speed is how long the shutter is open. It’s measured in fractions of a second (though you can create exposures in whole seconds in very low light conditions, e.g. to photograph the night sky).
Slow shutter speeds will be affected by camera shake unless a tripod and remote are used. A shutter speed of 1/60 (one-sixtieth of a second) is about the slowest speed that the average person can take a photo without being affected too much by camera shake, so the faster the better if you’re not using a tripod.
Slower shutter speeds can be used effectively to record movement in the object if a tripod and remote is used to keep the camera steady. The image above was taken using a shutter speed of 1/2 (half a second) and I kept my head as still as I could and swayed gently to move the dress only.
White balance
White balance is what a digital camera uses to remove unrealistic colour casts when taking a photograph. You often find that photographs taken under fluorescent lights, for example, have a strange blue colour cast to them – this can be corrected by adjusting the white balance settings on the camera.
If the white balance has been adjusted accordingly, objects that appear white in person will look white in the photograph.
Hope this post was useful to you – any questions, let me know below!

P.S. Here’s a great article with some excellent photography tips and tricks:
20 Easy Photography Tricks That Will Make You a Picture Taking Master

This is so helpful!!
Lauren
livinginaboxx
Lauren I'm really glad, I hope it helps as a reference for you when you do that photography course you mentioned…?!! x
Really, really useful thank you! I've bookmarked to come back to as I'm planning to pull out my DSLR again soon…
I'm so glad you think so, sweetie! Let me know how you get on x
Great post! I think I need to have a few reads through to take it all in though! Photography is something I really enjoy but need to improve!
Oh it's definitely a post for reference, Hayley – it's a lot to take in, even though I've explained it as simply as possible. Best thing to do is learn each one in turn by going away and practising, you'll get to grips with them (and improve your photos at the same time of course) in no time! Thank you xx
Incredible tips here for beginners and pros alike. I really need to not be so lazy when it comes to shooting as I understandably let my husband Peter shoot everything! When I put my mind to it though, I can take pretty OK pics myself. Yours are stunning!
… My background as a director meant working with literally some of the best DOP's in the world so although I directed the look, feel, framing- and performance it was a collaborative way of working where a lot of the magic of the process of the actual filming was left to those far better than I, technically. Fab post. Thanks for linking up to #brilliantblogposts x
I can't imagine how amazing it must be to work with DOPs who know so much about lighting, Vicki… when I studied at college I always wanted to do studio work, so creating images from scratch and of course using lighting was my forte. To have *that* sort of knowledge would be all sorts of amazing. Your OH's photos are out of this world!!
Thank you hun, glad you liked the post x
Fab tips…now I need to actually put them into practice with my DSLR x #brilliantblogposts
Practice is everything, hun! Work one thing at a time… once you know what each thing is and that you can change it, it makes everything so much easier. Good luck!!
such useful information thanks for sharing!
Thank you Amy, it was my pleasure x
Thanks for the easy to understand explanations! I've got a bridge camera but do tend to just stick with the auto functions as I've zero knowledge. Might just go and have a play about now – thanks x #brillblogposts
I'm really glad to hear that, Lorna – thank you, and good luck with it!! Experiment and keep practising! x
Great run down of all the terms. I'm a huge fan of the golden hour. I can't seem to take a bad picture during this time 🙂 http://www.SunshineDad.tk #BrilliantBlogPosts
Thanks for popping over and your kind comments, Sunshine Dad! You're right about the golden hour… you *can't* take a bad photo at that time :))
Wow, thanks for taking the time to spell it out so simply. Saving this for studying and referring back.
Excellent – thanks so much! I'm so glad it'll help you. My work is done…!!! 😉
This is so useful! I've just bought myself a 'proper' camera to start to learn more about actually editing my photos as I take them, not just dialing up and down intensity in Photo Editor, and I'll definitely be referring back to this. Thanks!
I am so glad, hun – I really hope you find the explanations easy to understand! Good luck with it. Practice makes perfect! x
I love this post. Thank you for explaining the jargon of Photography. It's very clear and concise. I have a Canon Rebel and it was incredibly overwhelming to learn the mechanics let alone photography. I shoot Manually but my pictures are very mediocre because Photography is not easy. Thank you for sharing your knowledge with us…very generous of you!
xo,
Janise
http://MamaInHeels.com
Thanks so much for the positive feedback, Janise – I'm so pleased it did what it said on the tin! ;))
I'd agree that photography is NOT easy. I got hooked using an SLR when I was in my teens (so that was the 80s, eep) and was taught the absolute basics by my dad. It was enough to keep me going till I went onto college to do it for my degree, so that's a good 25+ years of practice…! Hope the tips help xx
Robin and I have a Canon PowerShot G15, which I'm fairly confident falls into the "bridge" camera category, dearest Catherine!! It's capable of taking really gorgeous photos…but now I understand some of its shortfalls (compared to a DSLR) a little bit better, too. Still, while we're still learning photography – and we're definitely still learning! – I'm not ready to upgrade just yet; we need more practice (and more of your wonderful tutorials!) under our belts first!! XOXO
http://www.StyleIsMyPudding.blogspot.com
Monika that's wonderful!! It's great to get to know your camera first and get. lots. of. practice! That's the best advice anyone can give really!!! Thank you hun, you're a doll x
Oh Catherine, I am finally starting to get this. A year ago, you helped me so much with your explanations of the aperture. I have practised a lot and recently I bought a new camera which indeed has an ISO to 6400. Indeed, you wouldn't use that very often haha. But ai now know all these terms and I know what they are doing. I am not there yet, but I know I am on the brink of really grasping it. Ron and I had private lessons on two Saturday mornings from a photographer who is patient, relaxed and a good teacher like you are. Helped a lot. This ploughing on, but we will get there. Practise, practise, practise.
Greetje
Sorry some typing errors. I meant… Still ploughing on…
Greetje that's SO good to hear!! I'm really pleased the posts have come in useful, it's not the same as having one-to-one lessons with someone but at least it's a reference you can come back to again and again.
And you're exactly right about the practice!! It makes perfect, as they say. Thank you dear Greetje x
Great article Catherine! I've been considering getting a 50mm lens for my Canon because the kit lens is super slow.
Debbie
http://www.fashionfairydust.com
Ahhh that's a very good idea, Debbie. A slow lens is no good as soon as you start to loose light as I'm sure you've found out. You won't believe the difference it'll make – plus you'll get great blurry backgrounds and bokeh: lush!! Thanks hun, glad it's helped x
This is such a useful post, thank you! My husband bought us a DSLR a while ago but I have no idea how to use it. This post helped me understand the science behind it all a little more. I feel motivated to try it out when we go away in a few weeks. Thanks.
Claire
That's great, Claire – learn the language is just part of the process! The trick is to just take lots and lots of pictures, use the different settings and learn from the results you get. I'm still doing it now and I've been using a DSLR for over 25 years…!!
I'm sure I will read this again a few more times! I'm in the shopping around for a DSLR phase, but when I actually own one I will be out to learn all I can. :o)
JJ
http://www.dressupnotdown.blogspot.com
It's a very good idea to learn all your camera and the basics of photography, JJ – there's no point spending money on a DSLR if you don't learn how to use it to its full potential 🙂
I'm so rubbish at remembering at what iso and aperture mean.
I didn't know about Golden Hour before.
Rubi | The Den | http://www.the-den.blogspot.com
Glad you've learnt about eh golden hour, Rubi… it's a godsend! And hopefully my explanations of aperture and ISO have helped a little…?! x