As it’s the height of summer in the Northern Hemisphere (and the UK has seen some sun at last), I thought I’d revisit one of my posts from my photography tips series and update one of the most popular. Taking photos in strong sunlight can cause all sorts of problems for any photographer – not least a (fashion) blogger. Here are 8 tips for getting the best results when shooting on sunny days!
Light is the key to taking better photos. The more light you have, the higher the quality of your pictures because cameras respond better to and like a lot of light.
Think of it this way: The more light there is travelling through the camera’s lens and shutter, the more information the ‘film’ has to interpret. The more information on the image – the sharper and more detailed the photos.
You can break down outdoor lighting conditions into three very basic groups: Cloud, rain and sun.
PLEASE NOTE: Do not, under any circumstances, look directly at the sun either through the lens or otherwise if shooting into the sun. Safety first, folks.
Although it’s a camera’s dream to have lots of sunshine, it can be a photographer’s nightmare. Too much light and/or the wrong time of day can cause lighting headaches and you can easily end up with unflattering results – it can cast high contrast shadows on your face and outfit and makes you squint as well as bleaching the image. Strong, direct sun should ideally be avoided at all costs, but you can work with it in many cases.
This is the easiest way to cope with bright sunshine – I’m a bit of a squinter so even in winter I’m often in sunglasses. If the sun is blinding your eyes they really are a necessity. Remember readers like to see blogger’s faces so try not to wear them in every outfit post if you can help it.
My trusty go-to black cat eye sunglasses (above) are always in my handbag so that I have them if we do an impromptu photo shoot and it’s super sunny.
Make sure it’s not dappled light or it will cause havoc with the photo’s exposure. If the sun is strong there will still be enough light (remember the sun is four quadrillion times brighter than a 100W light bulb). Here are two examples where you can see the strong sunshine in the background but the shade was far softer and more flattering:
We ducked down a back street (above) in London to find some shade – the sunlight in the background created some lovely bokeh.
Here the blue stripes of the dress (above) looked far richer for being in the shade.
Personally I think this is the best way to get flattering light when the sun is really strong. You’ll need to experiment with exposure settings a little if you want to avoid too much flare from the sun. However, you’ll get a wonderful backlit halo effect:
This was late afternoon sun (above) and we shot into the sun but also slightly at an angle – strong shadows can create some great graphic interest to an image.
By shooting with the sun behind me (above), it made a soft pastel outfit stand out from the background – the soft halo effect around my body and hair was really pretty.
Pin this (below) to remind you:
To see how much of a difference positioning can make, compare the two images above. We purposely took the first photo with me facing the sun, knowing it would be too harsh for an outfit of pale yellow and creams. As well as the unflattering shadows on my face, it has totally bleached me out – it looks like I’m wearing white from head to toe.
With the sun behind me, the light overall is softer, the colours are truer, my skin tone is warmer and there are more mid tones overall.
So be brave and move your position in relation to the sun. It may take a few goes to get the shooting angles and exposure correct, but it’s worth it.
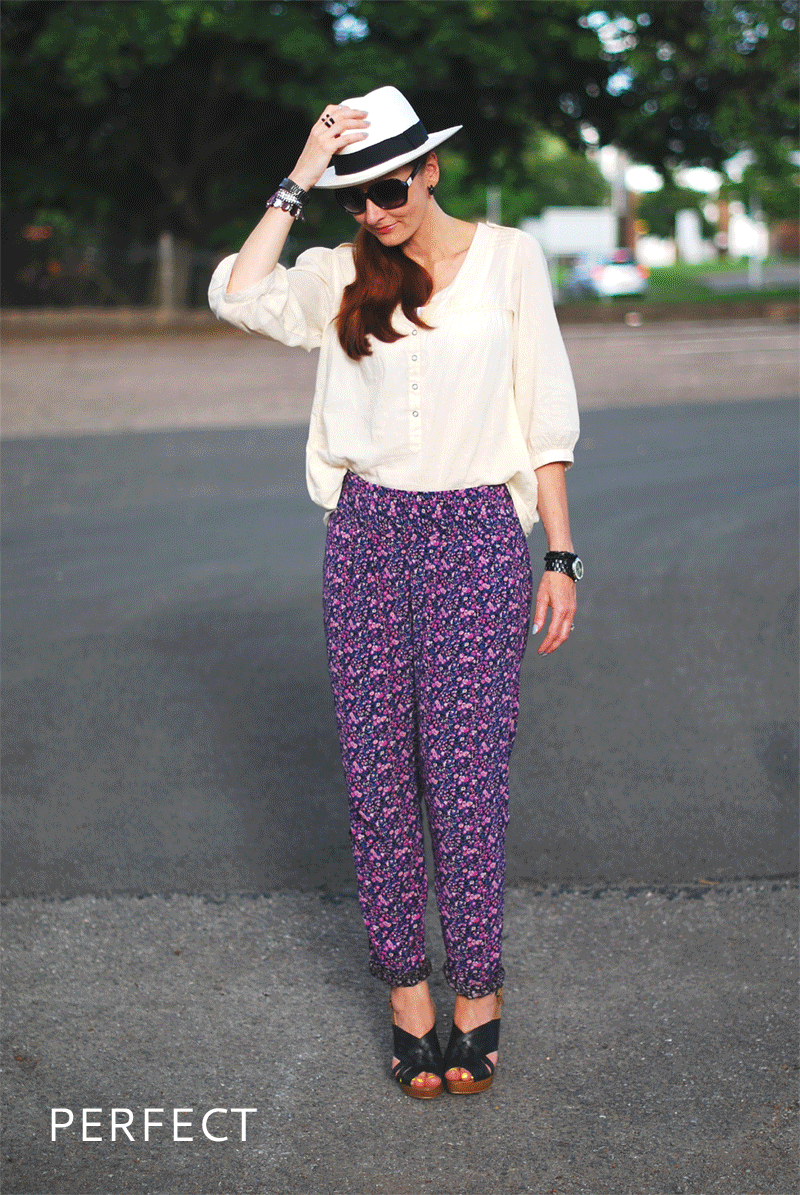
If you’ve got sunny intervals, waiting for clouds to cover the sun is often a preferable option. When photographing this outfit (below) the sun was constantly in and out, so we experimented a little and took a few test shots. Before showing you the rejects, the final image I chose was this one:
As you can tell, the sun had gone behind the clouds for this shot. But because the cloud cover was very thin, it cast a really atmospheric light. It was a sort of strange glow, which created a lovely depth to the image and made the outfit pop.
Really thin cloud cover can be a godsend – it diffuses the harsh light but gives you maximum brightness.
Want to see what the other options were? See below – we experimented…
The golden hour is the hour of the day leading up to sunset (or the hour after sunrise). As most of us are dressed and can be ready for a shoot in the evening as opposed to the early morning (I couldn’t possibly look awake that early in the day), it’s more convenient to go with a sunset that will create a beautiful light in your photographs and won’t be as unforgiving as overhead sun.
The golden hour is a favoured time of day for many photographers to shoot – you’ve just got to be ready to get your timing spot-on (you can find yourself in a race against time with the sunset, but the results are worth it). Once you’ve started, work fast.
(Summer tends to produce better golden hours as the sun takes longer to set due to the angle it moves at, unlike winter when it drops down almost vertically below the horizon.)
We had about 10 minutes of this orange glow from the setting sun (above) to get this shoot done – the light is incredibly flattering.
The setting sun on holiday (seen here in the Greek island of Santorini, above) is an absolute gift and one that should be taken advantage of at every opportunity. You can get graphic, bold shadows and soft, warm lighting – the best of both worlds.
If the sun is setting the light will be very soft and very warm. Creating flare from the sun during golden hour is easier than at midday because the sun is much weaker and lower. With some careful positioning, you can position the sun to just peek out from behind you and create some beautiful solar flare spots. This takes practice, but it’s probably my favourite effect to create with the sun.
You’ll often find you end up with green spots of light as the sun hits the lens (above) – this effect is totally normal and part of creating solar flare.
So, think about everything I’ve told you so far. Now go ahead and forget it all (well, not quite all of it…) – it’s time to break the rules!
I know I’ve said avoid shooting in harsh sunlight, but I’m going to give some examples of where it can work. Always be ready to break the rules (though my ‘rules’ are really only tips of course). Be adaptable depending on your outfit, the location, and the time of day.
Deep, bright colours photograph well in very strong, direct sunlight. Like the paler colours above were bleached out facing strong sun, vibrant colours can be deadened if the sun is behind you. With some exposure experimentation and correct angles (to avoid a really big, dark under-nose shadow), you can get depth, tone and good contrast all at the same time.
[Original post]One of my favourite shots in direct, strong sunlight (above). The deep red, black and grey were made to look even richer in the winter sunshine. A lighter background actually reflected some of the light back to my face so the shadows didn’t appear all that dark.
Another example (above) showing that reds and blues respond well to bright sunlight. It shows the texture as much as the colour, giving interest to the different fabrics and accessories.
The location and/or the contrast of colours and background are sometimes better suited to full sunlight on the subject – take shots from a few different angles (like point 4) to see what works best. Sometimes only when you compare different shots can you see that X works, and Y doesn’t.
[Original post]The stripes of the nautical outfit (above) were echoed in all the lines of the horizon and gates in the background, and the sun on the field made the green luminous, giving a lovely contrast to the white top.
Deep blue skies provide some of the most gorgeous backdrops – so being on a clifftop (above) meant unending blue sea and sky which provided a solid contrast to my simple outfit.
It goes without saying that if you have a white sandy beach to shoot on, you’ll want to take advantage of the bright sand and blue sea – especially if your outfit is a dark contrast as mine was.
The best advice really is to experiment. Rules are made to be broken, so use these tips as guidelines only. Here are some blogs that I think produce amazing photography who use fantastic lighting to inspire you:
The Marcy Stop (see this, this and this post as great examples)
Eat Sleep Wear (this, this and this post)
Keiko Lynn (this, this, and this post)
A Southern Drawl (this, this and this post)
Prosecco & Plaid (this, this and this post)
Forever Amber (this, this and this post)
Study their images. Look at the lighting and the position of the sun. Are they standing in the shade or in the sunlight? What does the time of day appear to be? How do the backgrounds complement their outfits?
If you’re shooting on a very sunny day check your ISO setting (for an explanation of ISO see this post). If you’ve accidentally left it on a faster ISO setting that’s for lower light levels you may find the camera can’t cope with the amount of light blasting in and bleaches everything out. So if you find you’re getting bleached out pictures and can’t understand why, that may be the reason why.
For more tips for better photos check out my Photo Tips category page.
HAVE THESE TIPS HELPED YOU AT ALL? HOW WILL YOU BE UPPING YOUR PHOTOGRAPHY GAME? TELL ME IN THE COMMENTS BELOW!
LIKE THIS POST? YOU MIGHT ALSO WANT TO READ…
– 7 TIPS FOR PHOTOGRAPHING OUTFITS IN THE RAIN
– PHOTOGRAPHY JARGON EXPLAINED – SIMPLY
January is just about over AT LAST and I couldn't be more pleased - let's…
Something a little different this time... for my latest Things I'm Loving This Month I…
Happy 2024! It's January 1st, so that means... time for my annual bloopers and outtakes…
What's that, I hear you ask? A STRESS-FREE Christmas? What is this sorcery she speaks…
Ever wished there was a magic wand that you could wave to help relieve your…
In my Things I'm Loving This Month I have great gift-giving alternatives, the origins of…