The selfie in question was one I was really happy with, because everything seemed to work for that photo: I was happy with my outfit, my hair, my makeup, the lighting, my expression (click here to see it)… It prompted me to leave this caption:
❝
DO NOT BE FOOLED by photos like this on Instagram – I often have people compliment me on my “flawless” skin or tell me I look younger than I really am… so kind but it’s all smoke and mirrors! I look JUST as rough as the next person without a good foundation, the right lighting and a practised “selfie” face. However I don’t use Face apps to smooth anything out and I don’t take a gajillion selfies like a Kardashian to get just one (I take maybe 3 or 4). I just know how to make myself look the best I can. And I’m perfectly okay with not looking perfect 95% of the time! So don’t look at mine or anyone else’s selfies or blog posts and think they look like that all the time… THEY DON’T, and you shouldn’t beat yourself up about it as a result. Remember – smoke and mirrors…!!
❞
It triggered a lot of really interesting comments, most of which were the answer “Yes!” to the question I left at the end of the caption: If you want to know a few clever tricks I have for taking a good selfie let me know and I’ll do a blog post.
Well whaddya know – this IS that blog post! Whilst I definitely won’t be sharing any pearls of wisdom on how to get Kylie Jenner-style plumped lips or how to pull the perfect duckface, I WILL be talking more about easy tips and tricks to do with the best lighting, makeup, angles, etc. to make you look your absolute best.
And remember… As I said in the Instagram caption – this is all smoke and mirrors. I’m not being modest when I say I do NOT wake up looking like this, if ONLY that were true! It takes me as much effort as the next woman to do my hair and makeup and wake myself up enough to look bright-eyed and bushy-tailed.
It’s just a snapshot in time – a mere one hundredth of a second or so from a very particular angle. The chances of you seeing me that way are almost nil, but like the next woman I like to see myself presented the best way possible (doesn’t stop me showing off the worst of the worst though)…!
Please note: I DO NOT use Facetune or any similar apps to smooth out wrinkles or change my features. I DO believe in looking my best and using clever tricks like lighting and makeup, but I don’t believe in artificially altering my image (who agrees that the girl in this image looks way better without Facetune)?
So here’s exactly how to improve your selfies in 11 easy steps – let me know if you find them useful!
Lighting is the MOST important thing when it comes to taking a good selfie – it can make the difference between a great shot and a terrible one. The number one rule: NO OVERHEAD LIGHT.
Use light that’s coming from the front only. Avoid overhead light at all costs as this will cast unflattering shadows, even on a dull day. I thoroughly recommend never, ever taking selfies in the open air. Light from the front makes your skin look even all over and doesn’t emphasise wrinkles or jowels (the bane of my life)!
For example…
1A. A selfie taken indoors, right in front of a window to make the best use of natural light that hits your face from the front, not from above. If this were taken outside I’d have a “five o’clock shadow” from all the overhead light.
1B. Cars are known for being one of the best places to take a selfie, and for good reason: No overhead light (convertibles excluded). This one above was taken in the evening when the light was getting low, so the red streaks you see across my face (which I rather liked!) were the brake lights of the car in front.
If you ARE only able to take selfies outside, or if you’re inside and the light is low, get some more light by using a reflector.
For example…
2A. This is actually the selfie the above quote came from: A good hair/makeup/lighting day! What you can see is that the bottom half of my face is almost blasted out with lovely bright light – reflectors are GENIUS at making this happen. Although you can make one yourself with a piece of card covered in silver foil, the ones you can buy online are very very reasonable:
This is the reflector I use:
Neewer 60cm/22″ translucent / silver / gold / white / black collapsible light reflector £9.99
(US link, $10.99)
Do note you don’t get five separate reflectors, it’s a 5 in 1 with zippable covers, which is actually better because it makes it more portable (and it collapses into a circle roughly a third of the size so will easily fit into your handbag… unlike a piece of foil-covered card)!
Just take the reflector and play with it until you see the difference in the light – it’s an absolute lifesaver, you’ll wonder how you ever did without it. You can also use it for adding in extra light to anything else you’re photographing, like flatlays or small corners of your room.
Makeup makes ALL the difference in selfies. There is difference between the sort of makeup that looks good in real life and the sort that looks good in selfies – the sort of makeup you see so often on Instagram today (all the heavy “Instagram brows”, contouring and overlined lips) doesn’t look so good in real life, especially if you’re a little older like me and not exactly wrinkle-free. However, a good foundation and a touch of highlighter will go a long way.
For example…
3A. In this selfie I’d tested the Charlotte Tilbury range of makeup – all natural, soft colours. Don’t forget people can zoom into your photos on Instagram now so any mistakes/badly applied makeup will show.
As well as getting the base right, selfies do tend to wash your face out so don’t skimp on blush and lipstick for adding colour to your face.
For example…
4A. Here (above) I’m wearing base, blush and lipstick only – no eye makeup (I was showing off my eyelash extensions). But the red lip adds balance to the big lashes and colour in my cheeks was essential, especially as I’d put my hair in a towel.
4B. A different kind of bold lip – I wanted all the emphasis on this deep plum colour so I kept my hair simple and the colour of my top contrasting.
Left your hair unwashed for just one day too many (like me)? Run out of dry shampoo (again, like me)? Don’t let a bad hair day or even lack of time for much make up stop your selfie game in its tracks – use hats or sunglasses.
For example…
5A. A hat for a bad hair day AND sunglasses for lack of makeup. If time is of the essence then use one or the other – or both as I did here…!
– DON’T MISS A SINGLE POST –
Enter your email address in the box below and you’ll be sent an email every time I publish something new!
This is a fantastic tip for adding interest to your selfie. One bold statement-making accessory will make your image really fun and exciting.
For example…
6A. Those sunglasses are massive for a reason – to hide my tired eyes! Not only that but they add a graphic element to the image – it wouldn’t have been anywhere as interesting without those two big gold circles filling the frame.
6B. More sunglasses, but as they were so dark the bow tie balances the black out. A posed “tug on the ear” was a good way to show off the watch I was wearing – think about ways you can use your hands to show off rings, jewellery and watches.
This one is pure practice – knowing your angles is entirely an individual thing.
For example…
7A. I know that most items I wear look better when my body is at slight angle to the camera. I know that I should hold the camera slightly higher than eye level (it makes your eyes look more awake if you have to look up rather than down). I know that my right side is my best side. All of this takes practice and a LOT of test shots. Practice when you’re not under pressure [to publish a post] and study the images to see what works best for you. Remember MOST people look better from a slight angle, not head-on.
Don’t let your background detract from your face – messy, busy backgrounds are distracting!
For example…
8A. This background is perfect – it’s the small cloakroom in my parents’ house. With the door shut behind me I’m both near the window for good light and in front of the wall and door for a clean, light background.
8B. This was taken in a hotel room – it was taken late afternoon as the light was beginning to fade outside. As the the room was so large nothing in the room was really lit up so it gave the effect of a dark background which echoed the bold frames of my glasses. I could have done a bathroom selfie, but all that unflattering overhead fluorescent lighting? No thanks. If natural light is failing use the window as a “tripod” – rest your phone or camera right against the window so you eliminate as much shake as possible.
It’s apparently a fact that brighter, lighter photos on Instagram are more popular. The more murky, dark or saturated the photo, the less likes it will get. The days of using filters to death are mostly behind us, and it IS a personal thing as to what effect you like, but unless you know exactly what look and feel you want to your feed it’s best to keep it simple. There are many apps like VSCO, Snapseed and ColorStory that will not only add preset filters but will help you adjust the finer points.
Personally, I prefer to get the photo as near to how I want it when I’m taking the photo and just do a little tweaking after. I’m happy to use the Edit function in Instagram itself – the settings I generally tweak are:
Increase Lux (the half dark/half light sun icon at the top of the screen)
Increase brightness
Increase contrast
Increase warmth.
All of these I use in VERY small amounts – it’s only brightness that I tend to use a little more than the others to get brighter, more appealing images.
For example…
9A. Here I tweaked all of the settings as described above. It meant my eyes look brighter, the colours were a little richer (without becoming saturated) and all the focus was on the funky glasses. If everything is too dark and grey (too little contrast) you’ll end up with a very flat, lifeless image.
Your selfies don’t have to look the same composition-wise every time: Play with what goes inside the frame.
For example…
10A. Here I used my arm to hold the sunglasses and create a more interesting, graphic shape: My head is off to the top right corner of the frame but my right arm draws your eye towards my face. Don’t be afraid to create bold shapes.
10B. This one goes against my rule of “head-on is less flattering”, but it’s actually the symmetry that I like here. Don’t think your whole head has to be in the shot – unless you’ve got a funky top knot or cool hair accessory the top of your head isn’t really all that interesting… Chop it off so the focus is on your face! Either across the middle of your forehead or just above your natural hairline works best (depending on your hairstyle.)
So instead of all that posing, why not have some fun? Your followers will love to see you being a bit spontaneous every now and then.
For example…
11A. This was a one-take selfie which I featured in this post where I talked about my teeth whitening and filing. It was taken in the restaurant toilets straight after my dental appointment – it went against my “no unflattering overhead light” rule, but as it captured the joy I felt at seeing my new teeth it didn’t really matter. The fun factor overruled sensible lighting in this instance!
11B. Another playful shot – it was posed to some extent, but I took several shots to get that fun “I know something you don’t” look. Note how you don’t have to be looking at the camera every time – set up the shot and look away for a change.
11C. One of my favourite EVER selfies – it still makes me laugh today! Whether you’ve got a photobombing friend, a posing partner in crime or a dog that looks like Master Shifu from Kung Fu Panda(!), don’t be afraid to publish the fun ones. Your followers will love you all the more for it.
Generally, most people take selfies with their phones – I now take mine with my Olympus Pen (US link), a camera designed with bloggers in mind. It has a flip-down screen and produces amazing quality images, plus it has WiFi so you can upload images immediately to your phone for posting to Instagram.
Unless you have an excellent camera on your phone (my phone is an iPhone 6 and the camera is useless unless there is loads of light, even then the photos are very grainy) I’d avoid taking selfies in low light with a low-quality camera phone if you can.
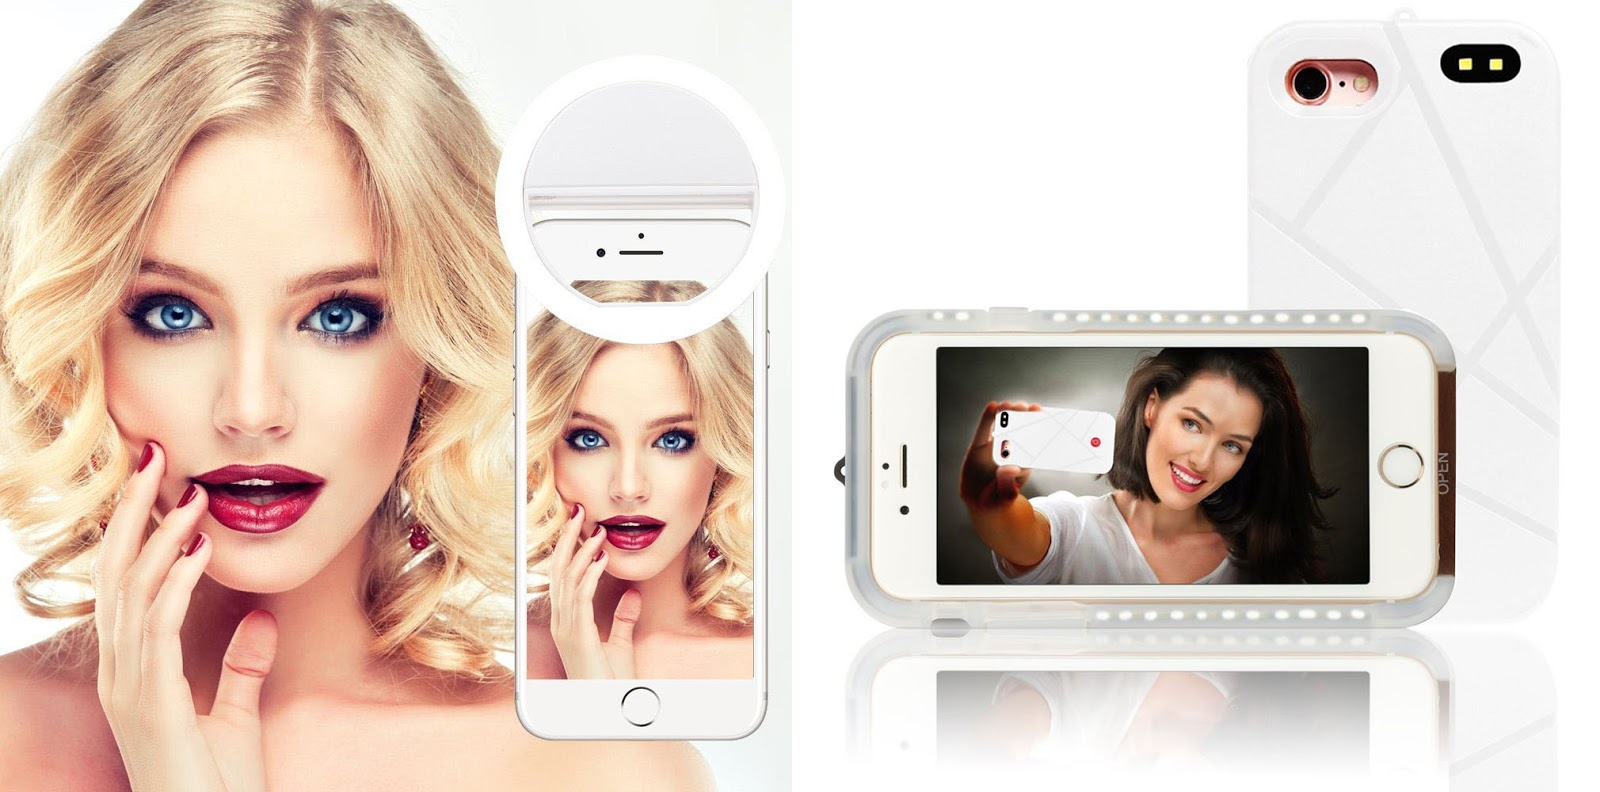
Or have you considered one of these?
Left: Selfie ring light £6.99 (US link, $10.99)
Right: Light up selfie cell/mobile phone cover £20.99 (US link, $24.99)
I have both of these – they are BRILLIANT. They give you that extra bit of light either outside when the light is failing, when you just don’t have enough light indoors, or if you’ve got some unflattering overhead lighting (bathroom selfies?!) where you want to blast out the shadows. Definitely a great thing to invest in, especially if you only want to carry your phone and not a separate camera (even if it does have Wifi)…
DO YOU THINK THESE TIPS WILL HELP YOU WITH YOUR SELFIE GAME AT ALL? I HOPE THEY DO… COMMENT BELOW, OR TAKE IT TO TWITTER @NOTLAMB!
Disclosure: This post may contain affiliate links which means if you click through and buy I may receive a small commission.
January is just about over AT LAST and I couldn't be more pleased - let's…
Something a little different this time... for my latest Things I'm Loving This Month I…
Happy 2024! It's January 1st, so that means... time for my annual bloopers and outtakes…
What's that, I hear you ask? A STRESS-FREE Christmas? What is this sorcery she speaks…
Ever wished there was a magic wand that you could wave to help relieve your…
In my Things I'm Loving This Month I have great gift-giving alternatives, the origins of…