After having published part one of this two-part post where I discussed shooting tips for improving your blog photos, the time has come to talk editing. Post production is just as much of an important part of the process – here’s all you need to know!
A lot of great photos – great for their composition, lighting, backgrounds and so on – are ruined due to their lack of attention… in the darkroom. That’s what I REALLY want to say, having studied for a photography degree long before the days of digital you get used to saying certain things. As I mentioned in the last photo tips post, old habits die hard.
But here’s the thing: Digital photography is designed to require attention in the darkroom in post production. I think a lot of people consider tweaking images “cheating”. There is a huge difference between using Photoshop to alter our appearance (giving us slimmer hips, longer legs, etc.) and using it to enhance the image. Photography is not just about what someone looks like in a photograph: It’s about light. It’s about shadow. It’s about colour. It’s about composition. It’s about creating mood.
It’s about telling a story – and blogging is no different.
Boosting brightness or bringing out the colours in an outfit is not the same as faking slimmer hips or longer legs. Don’t be afraid of editing your photos and post production: be afraid of doing nothing to them.
Something to note: I often read bloggers talking about “editing their photos” when they mean enhancing them in post production (with e.g. Photoshop or Lightroom, or even Picmonkey). When I say editing photos I mean whittling down 150 shots to just 7 or 8 for a blog post – it’s the final edit that I then tweak/enhance in post production. In my art college days, editing meant printing a contact sheet to choose which ones to print. Oh, how times change…!
So with all that in mind, here are my best tips for improving your blog outfit photos with editing and post-production…
1. Be ruthless when editing
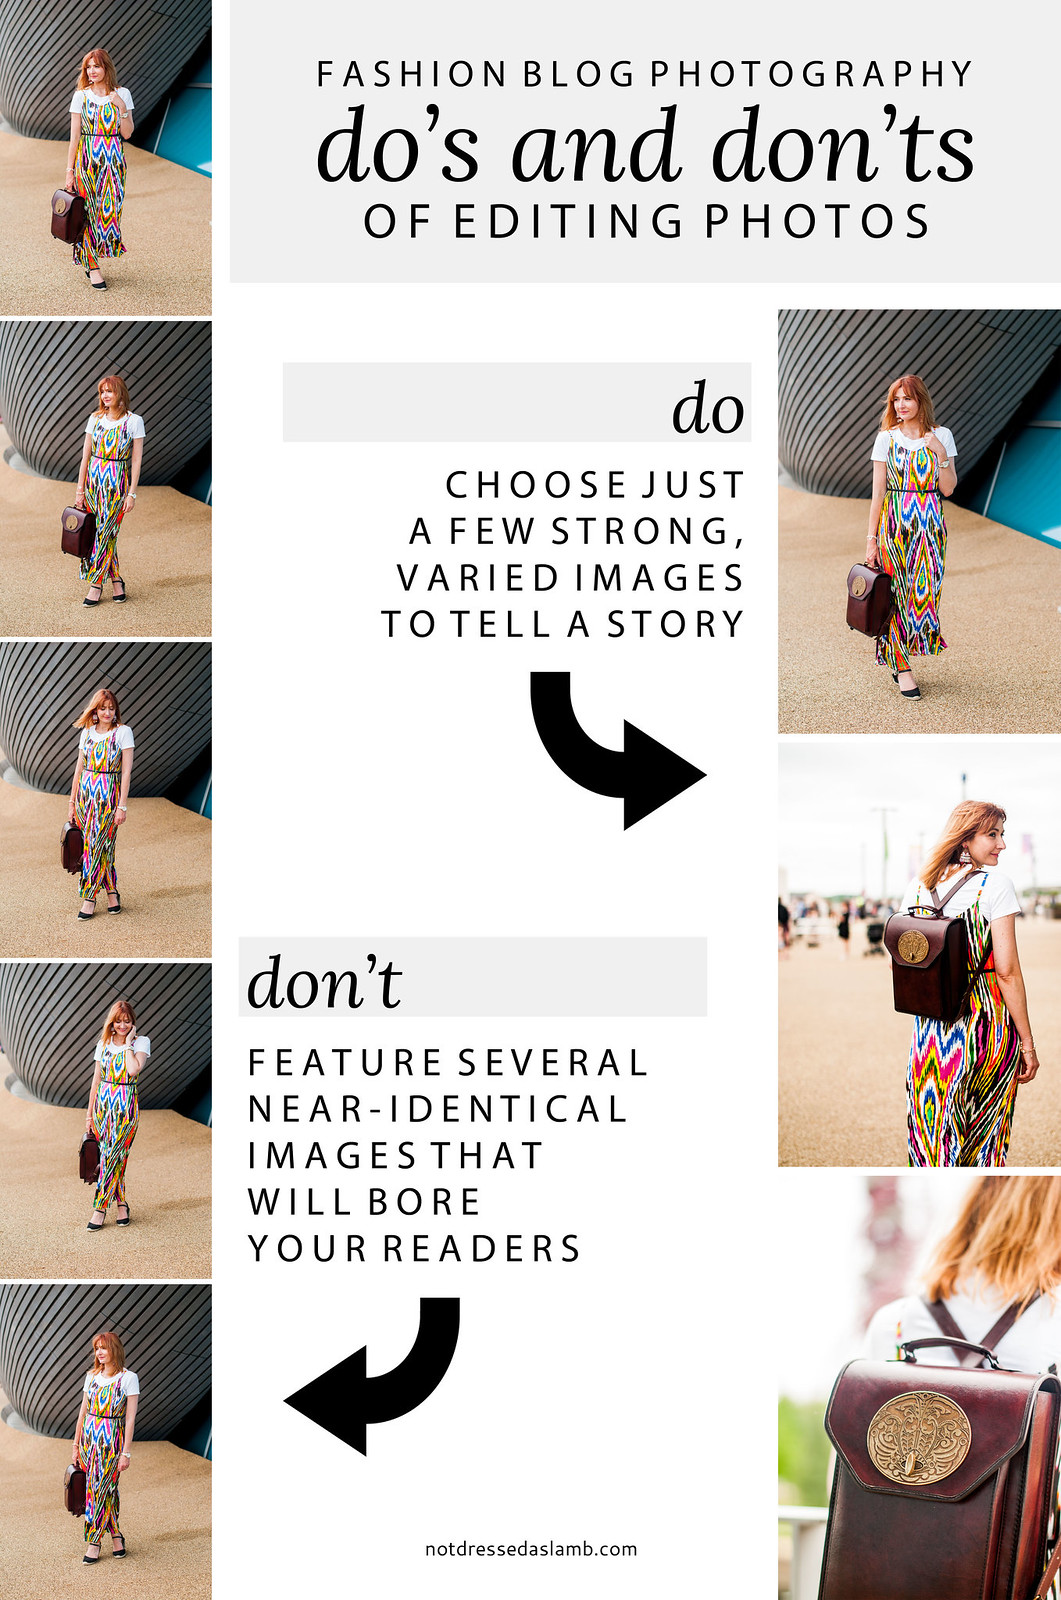
Are you guilty of publishing several near-identical shots, one after the other? It’s far better to have just three strong, varying shots than 12-15 shots that look almost the same. If readers scroll through and find loads of images that they can’t see any difference between, they’ll start scrolling through really quickly and probably miss important information, a great piece of writing or your shopping thumbnails/affiliate links.
See below…
These images were from the same photo shoot: I could have chosen to just shoot/publish all of the full-length shots (I’ve shown just five here; I could have included 20+). The three on the right – which include the first full-length shot – tell you so much more than those five near-identical photos do.
Don’t bore your readers with the same photo repeated 10 times – or even twice. It may seem sad to not publish the other ones that you loved so much, but being ruthless and knowing what to include and what not to include is the difference between mundane pictures and great imagery with an interesting narrative.
2. Increase brightness and contrast and remove colour casts
The biggest mistake people make when tweaking photos for their blogs? Leaving the images far too grey, dark and murky.
Unless you are going for an actual style of photography where you’re trying to capture something dark and mysterious, always always increase the overall lightness and brightness. Likewise, shadows that are making your face or certain areas of your outfit seem too dark won’t do anything to make your outfit jump off the screen. Colour casts just look (usually) cold and strange and won’t reflect the colours of your clothes and accessories accurately.
As an example, take a look below…
The image on the left is a JPEG, with no post production whatsoever. The one on the right is the RAW image I’ve put through post production in Lightroom (see point 6). You’ll see that the image is lighter, brighter, and isn’t grey and dingy. There is a trend at the moment for “blown out” images (where the highlights have almost no detail and the image is overexposed overall) – if that’s your thing then that’s great! but if you want something more realistic and less stylised then look at how you can make the image lighter and brighter.
The four things I would recommend adjusting are:
- Brightness: Most images need to be made a little (or a lot) brighter
- Contrast: Again, most images benefit from an increase in contrast (whites get whiter, blacks get blacker)
- Shadows: If your face is in shadow or you’re losing detail in darker areas, lighten the shadows – it can make a huge difference
- Colour cast: Sometimes the light can produce very blue images so correct the colour cast and add a little warmth – this always looks more inviting than cold pictures
The thing to do is to experiment – if you’ve never tried lightening shadows before then just try it! I’d advise making a copy, or even better use layers in Photoshop, so you don’t permanently destroy the original* and you can compare your before and after (as above) – you might be amazed at the results. See this tutorial on how to easily brighten shadows and grey areas in Photoshop.
A quick test to see if your photos are too dark and grey: Screw your eyes up and squint at the picture – can you still make out what the outfit roughly looks like, and can you still make out the features in your face? If not, your photo is too dark and the outfit is probably blending into the background. That’s when you KNOW you need to address the brightness and shadows.
*If you’re using Lightroom – see point 6 – you can’t destroy the original, the original file is never changed.
3. Lighten the whites of – and reflection in – your eyes
This is such a small thing but it makes a HUGE difference. If you’ve ever thought your eyes look lost (or worse, dead), consider lightening the whites of your eyes just a little bit. Then making the reflection in your eyes really bright gives “life” to your face (I don’t consider this artificial enhancement because everyone’s eyes reflect light when looking towards something bright).
See below…
I love this photo, but it definitely benefits from a little lightening of the eyes. Don’t go too overboard though or you’ll run the risk of looking artificial. I tend to increase the brightness of the whites in increments and switch between the two eyes, using the Dodge tool in Photoshop so that they lighten by the same amount. Then I make the reflection just that tiny bit brighter again to give the eyes the “life” they need.
Pin for later!
4. Crop to add interest
If you’ve found that you’ve ended up with three or four full-length shots, for example, that you can’t decide between, consider cropping one or two of the photos to create drama. Or crop to make the subject much more the subject of the photograph.
For example…
In the first set of images (white skirt) the landscape photo was a bit too wide, and the drainpipe of the building on the right was distracting. By cropping off about a third of the right hand side it made the image a square format, and I applied the rule of thirds by keeping myself off-centre.
The green dress image was different. I had a few full length shots that I liked – different poses but all taken from the same position so the composition was identical in all of them (see point 1). By cropping in closely and sacrificing some of the top of my head I made the image all about the outfit.
So make sure you experiment a little – just don’t crop too much (I’d crop off no more than 25-30%) or you’ll start to lose quality and the photo will become pixelated. Sacrifice an arm or a leg or even your head to focus all the attention to the right place.
5. Get the order right
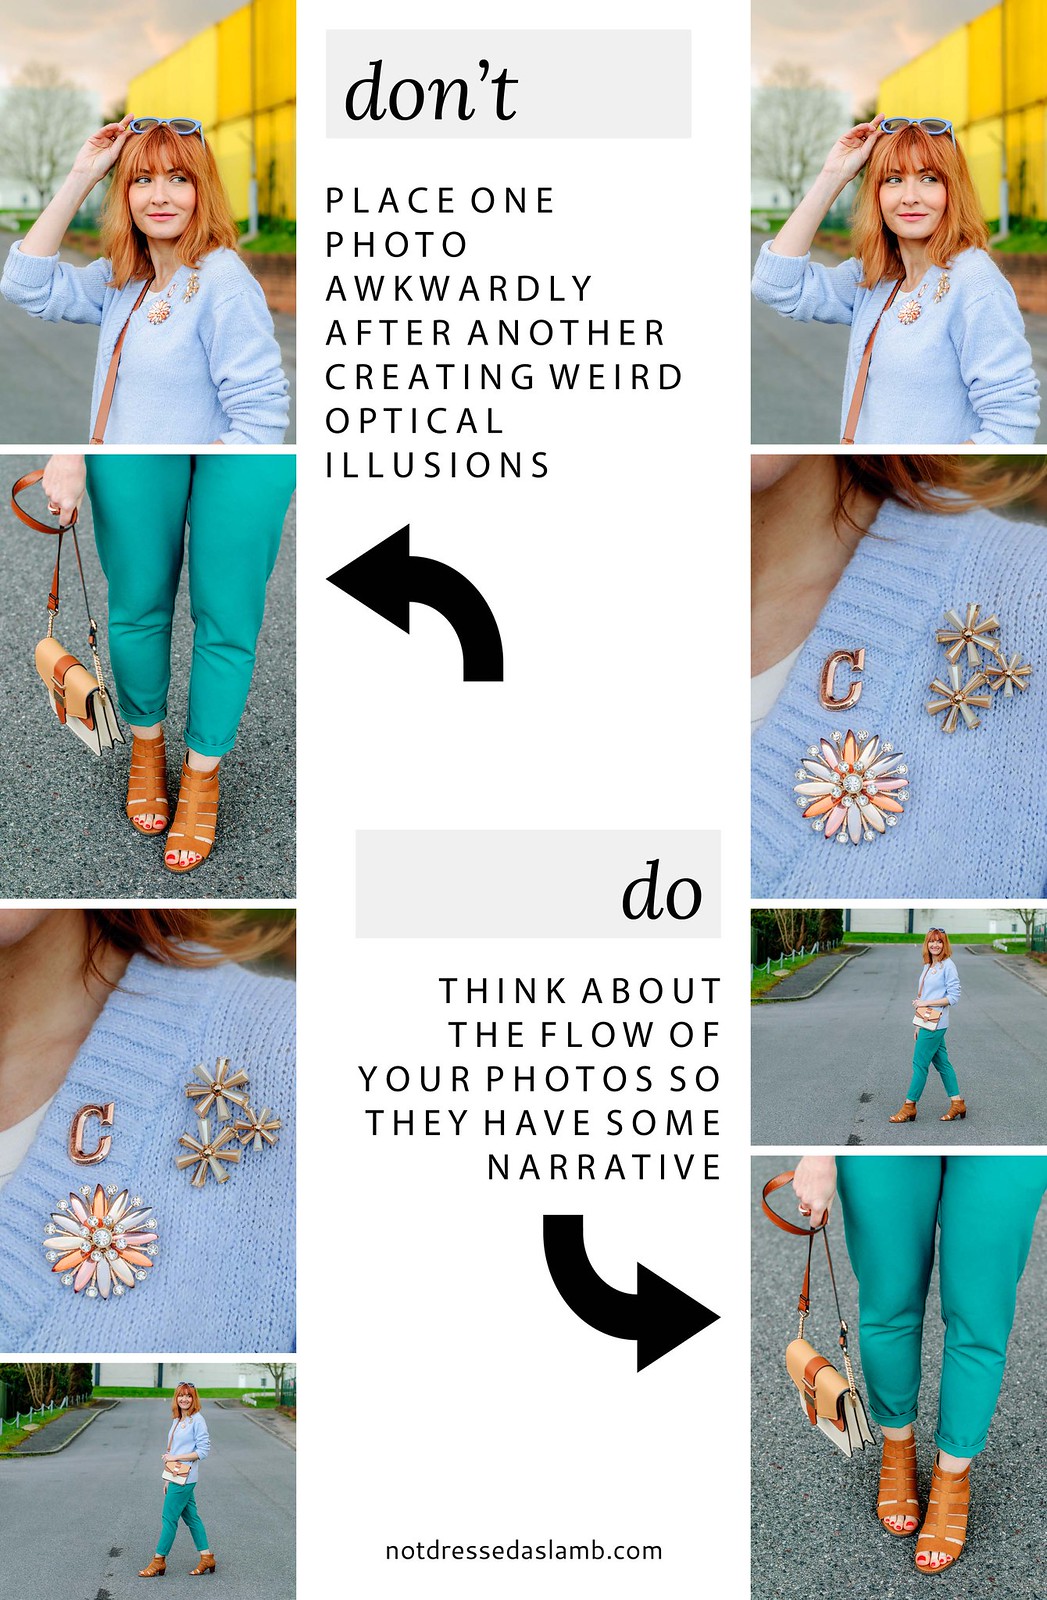
This is a common mistake: Not considering what order the images go in. Even if you’re only showing a few outfit shots, they should still tell a story (like a logical narrative) and not show a pair of legs in one shot “growing out of” your head in the shot above. It looks awkward and strange and will interrupt the flow of beautiful images.
For example…
The flow of your photos is so important. Have at a look at the way yours run one after another: Do they flow in a way that has some sort of narrative? Does each photo relate to the previous one and lead you naturally to the next? Above right you can see the classic “legs growing out of a short body” mistake that I see so often. Ensure you’re not creating some weird hybrid body shape with one photo on top of another.
In the example above right I started with a close up to suggest that the outfit is all about the accessories, showing the sunglasses and brooches.
I then followed with a super close up of just the brooches.
Then there’s a full-length shot to “reveal” the outfit in full.
As my legs were then on show the shot of my legs followed the full-length. The top edge of the last image is all outfit, so you wouldn’t want it to sit underneath an image that was all-outfit along the bottom edge.
Here it’s adjacent to an image of all road along the bottom, so it creates a nice clean break between the two.
6. Use Lightroom to edit photos
I’ve put this one last because it is something you have to pay for, but at about £10 per month it’s truly worth it. You also get Photoshop as standard, so if you were thinking of getting Photoshop, I’d recommend getting Lightroom instead so that Photoshop is then thrown in.
Here are 10 reasons to use Lightroom (better than anything I could explain succinctly). If you’re unsure about what Lightroom IS exactly, Wikipedia describes it as:
“A photo processor and image organizer. It allows viewing, organizing and retouching of large numbers of digital images and is non-destructive. This module is more for retouching, i.e., enhancing and improving digital photographs, including changing color balance, improving tone, removing red-eye effect, sharpening, reducing noise or converting to black-and-white. It has several standard presets for color correction or effects, and supports sharing custom presets online.”
In other words, you enhance your photos with Lightroom. You would never, ever leave a RAW image untouched – it’s grey and flat: it’s designed to be edited in the way YOU want it enhanced. There are no right or wrong ways to edit your RAW images. Some people like bright white, blasted images with high contrast, others like muted tones and dark shadows. It’s entirely up to you and what style you feel would work best for your blog.
What it DOES do
The most appealing thing about Lightroom, in my opinion, is the opportunity to use “presets”. Think of them as something similar to (Instagram) filters that you create yourself. If you’re starting from scratch with a set of images, you would enhance all the settings one by one (Brightness, Contrast, Temperature, Whites, Blacks, Shadows, Highlights, etc.) to your preference/taste, then you can save those settings as a preset.
Each of the rest of the images in that particular shoot can then have the preset applied to them (assuming you’re in roughly the same location with the same light) and you just whizz through post production by adding the preset to each image – they’re enhanced instantly. You can build up a little library of presets if you want to apply a similar look and feel to your photos each time.
What it DOESN’T do
Overlay text, add shapes, distort images, clone large parts of the image, those sorts of things. Those are Photoshop’s domain. Lightroom is about making images look beautiful simply using light, which is what photography is, essentially.
Although you don’t have to shoot in RAW to use Lightroom, the difference in shooting in RAW and enhancing in Lightroom compared to shooting in JPEG and then enhancing in Photoshop is huge. As in, H-U-G-E huge.
This is the same example I used in Part 1: Shooting Tips, but it demonstrates the difference between RAW and JPEG perfectly:
Remember this was using the same camera and the same lens, taken in the same location with the same kind of light. Shooting in RAW and post production in Lightroom is what made the difference.
There is too much to explain about Lightroom here in this post (it would probably make point 6 three times as long as the rest of the points put together!), and I’m still very much in the early stages of using it myself so I’m currently no expert.
If you have access to a course to learn how to use it I’d thoroughly recommend doing that, or search YouTube for video tutorials. You can learn how to do ANYTHING on YouTube…!
Let me know if you’ve found these tips helpful… I do hope they have! As always shout with any questions in the comments, or tweet me. I’ll be happy to help.
WHAT DO YOU THINK OF THESE EDITING AND POST PRODUCTION TIPS? TELL ME IN THE COMMENTS OR TWEET ME @NOTLAMB!
LIKE THIS POST? YOU MIGHT ALSO WANT TO READ…
– 7 Easy Ways to Improve Your Blog Outfit Photos (Part 1: Shooting Tips)
– My Greatest Photographic Moments of 2016




Oh hecky, I have some serious homework to do here!
Thank you so much for two good lessons, x.
Such great tips! I've found that inevitably, no matter how I shoot, brightening things up a tad post-shot really helps. I'm also so glad you mentioned editing down to only a handful of images and organizing their layout–I get frustrated when I click on a blog post and see a dozen similar images of the same outfit. It kills some of the magic, I think, versus having just a few really killer shots!
Fabulous post and incredibly helpful! Just pinned:) Love when you share these tips Catherine!
Heidi || Wishes & Reality
You look stunning. I guess that's not only because of your nature and outfit but also thanks to a great photographer. I guess he even made some magic tricks by using aurorahdr.com's tool.
Really useful tips! I'd love to shoot in RAW but I have to convince my husband first! I'll have to look into getting Lightroom as I've heard such good things about it from several bloggers now.
Emma xxx
http://www.style-splash.com
Hello Catherine! I've been reading your blog for some months but that's the first time I write. I just wanted to say your writes are really interesting, and thanks for this two posts about improving photos, really helpful tips.
Ester
(sorry about my English, it's not my native language)
Ugh. I do nothing to my pics. And there is a reason for this. I want those who follow my blog to see any outfit in it's natural state. I'm also way too lazy. Way. Too. Lazy.
Hmmm. Perhaps I need to change it up a bit! Great advice!
These are really great tips, I'll need to seriously consider getting lightroom
Lauren
livinginaboxx
Good tips. Thanks
Rena
http://www.finewhateverblog.com
I am doing some things as you recommend them (which makes me very proud) and some I don't. I don't shoot in RAW as I find those files soooo heavy to upload. But I will try next time. Promise.
Killing my darlings (not so many photos of the same) is something I wrestle with. I know from my own profession that I should, but it is hard… I love them all.
Greetje
Some really useful tips here Catherine. I'm going to start looking into Raw and Lightroom!
http://www.vanityandmestyle.com
Clearly your knowledge of photography, your creativity and professionality have had a VERY positive impact on your success. Sharing your knowledge with other bloggers is generous and also professional! judegramith
I managed to get hold of Lightroom for a one off payment and just bought the software, so no ongoing payments. I'm also finding the Anthony Morganti videos on Youtube to be fantastic and so helpful. I have a lot to learn yet though!
I've been brightening and contrasting, so that made me feel good. But getting the order right is enlightening, Catherine!!
I always do the same ones in the same order, and I might need to change it up!!
You always have such great ideas, and tips!
Thanks,
XOXO
Jodie
http://www.jtouchofstyle.com
Gosh…I'm useless at this Catherine!
I NEED to do better and am off to investigate now…. {hangs head in shame}
XXX
Samantha
Fake Fabulous | Style and fun with fashion, over 40
Really helpful tips! Thanks!
This was a really interesting read, Catherine! I've recently switched from Photoshop to Lightroom and am loving the flexibility and batch editing. I've also started using the Lightroom app for editing Instagram snaps on the go – baffles me that I don't hear many people talk about it because it's great! Also, yes to RAW every time. Could never go back to shooting JPEG.
Your photos always look fab!
Lily Kate x
jolihouse.com
I'm the worst with this… I think I can handle trying to brighten things up, tho 🙂